Interface Builder を使わない iPhone アプリを作る手順

iPhone アプリを開発する際、私は Interface Builder を使いません。 UI コンポーネントの配置なんて大した手間じゃないし、そのために起動時に余計な処理が増えるのはいただけないと思っていまして。
そんなわけで Xcode でプロジェクトを作成した後に Interface Builder 関連のコードを消すのですが、毎回やりかたを忘れてて思い出すのに苦労するので、備忘録も兼ねて記事にしました。単純に IB 関連のコードを抜くだけでは寂しいので、簡単なテーブルビューを表示するところまでやっています。私以外に必要としている人がいるのかわかりませんが、まあ IB を使う方も知っておいて損はないかと思います。
以下で作成するプロジェクトの全ソースは、以下の場所に置いてあります。
http://webos-goodies.googlecode.com/svn/trunk/blog...
まるごとダウンロードしたい場合は、 Subversion をご利用ください。
プロジェクトを作成する
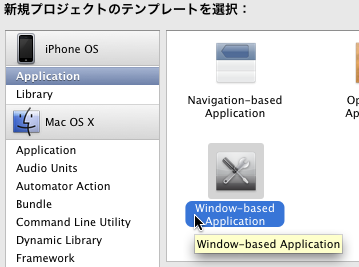
まずはプロジェクトを作成します。 Xcode を起動してメインメニューで [ファイル]-[新規プロジェクト] をせんたくし、 Window-based Application のテンプレートを選択してください。
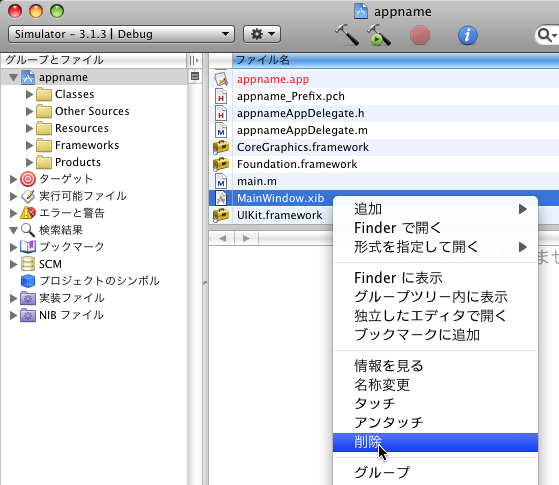
プロジェクトが作成されたら、 Interface Builder のデータファイルである nib ファイルを削除します。 Xcode のファイルブラウザで MainWindow.xib を選択し、右クリックメニューの「削除」を選択してください。
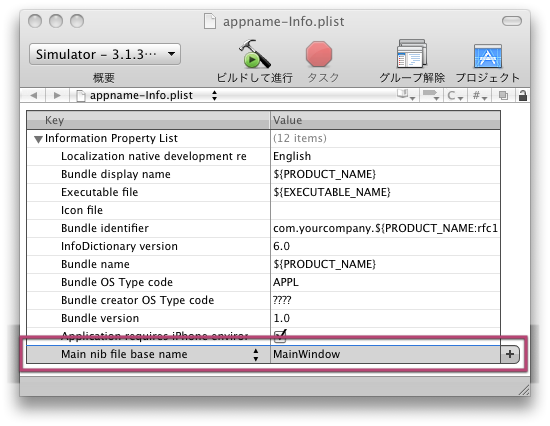
そして、アプリの起動時に nib ファイルを読み込まないように、 plist ファイルのエントリを削除します。同じく Xcode のファイルブラウザで appname-Info.plist (appname は作成したプロジェクト名)をダブルクリックで開き、一番下にある「Main nib file base name」という項目を削除してください。選択して Delete キーで削除できます。その後、ファイルを保存してください。
デフォルトでは、フレームワークは nib ファイルから適切な Delegate クラスを取得しています。その nib ファイルを無効にしたので、起動時に Delegate クラスを明示的に指定する必要があります。具体的には、 main.m の UIApplicationMain() の呼び出しを、以下のように書き換えます。「appname」の部分は適宜変更してください。
int retVal = UIApplicationMain(argc, argv, nil, @"appnameAppDelegate");
以降は必須ではありませんが、 Delegate クラスの @property, @synthesize を削除してしまってかまいません。具体的には Classes/appnameAppDelegate.h の以下の行と
@property (nonatomic, retain) IBOutlet UIWindow *window;
Classes/appnameAppDelegate.m の以下の行が削除できます。
@synthesize window;
これで最低限のコードのみのスケルトンが完成しました。エラーなくビルド・実行ができることを確認してみてください。
TableView を作成
次はウインドウ内に表示する TableView を作成します。せっかくなので、ナビゲーションバーにボタンを追加して、項目の追加・削除ができるところまで実装してみようと思います。
まずはヘッダです。以下の内容を Classes/MyTableViewController.h として保存してください。
#import <UIKit/UIKit.h>

@interface MyTableViewController : UITableViewController {
    NSMutableArray* items;  // 表示アイテムの配列
    int             nextID; // 次に作成するアイテム番号
}

- (void)addItem;
- (void)startEditing;
- (void)finishEditing;

@end
そしてインプリメンテーションです。 Classes/MyTableViewController.m として保存してください。
#import "MyTableViewController.h"

@implementation MyTableViewController

// 作成時に呼ばれる
- (id)init
{
    self   = [super init];
    items  = [[NSMutableArray alloc] init];
    nextID = 1;

    // ナビゲーションバーに表示するタイトル
    self.title = @"Template";

    // ナビゲーションバー左のボタン
    self.navigationItem.leftBarButtonItem =
        [[[UIBarButtonItem alloc]
             initWithBarButtonSystemItem: UIBarButtonSystemItemAdd
             target: self action: @selector(addItem)] autorelease];

    // ナビゲーションバー右のボタン
    self.navigationItem.rightBarButtonItem =
        [[[UIBarButtonItem alloc]
             initWithBarButtonSystemItem: UIBarButtonSystemItemEdit
             target: self action: @selector(startEditing)] autorelease];

    return self;
}

// 削除時に呼ばれる
- (void)dealloc
{
    [items release];
    [super dealloc];
}

// デバイスの回転に対応するかどうか
- (BOOL)shouldAutorotateToInterfaceOrientation:
    (UIInterfaceOrientation)interfaceOrientation
{
    return YES;
}

// テーブルビューのセクションの数
- (NSInteger)numberOfSectionsInTableView:(UITableView*)tableView
{
    return 1;
}

// セクションの行数
- (NSInteger)tableView:(UITableView*)tableView
 numberOfRowsInSection:(NSInteger)section
{
    return [items count];
}

// 各行の表示内容を返す
- (UITableViewCell*)tableView:(UITableView*)tableView
        cellForRowAtIndexPath:(NSIndexPath*)indexPath
{
    NSString*  identifier = [items objectAtIndex:[indexPath indexAtPosition:1]];
    UITableViewCell* cell = [tableView dequeueReusableCellWithIdentifier: identifier];
    if(!cell) {
        cell = [[[UITableViewCell alloc]
                    initWithStyle: UITableViewCellStyleDefault
                    reuseIdentifier: identifier] autorelease];
        cell.textLabel.text = identifier;
    }
    return cell;
}

// 行がタッチされたときに呼ばれる
- (void)tableView:(UITableView*)tableView didSelectRowAtIndexPath:(NSIndexPath*)indexPath
{
    [tableView deselectRowAtIndexPath:indexPath animated:YES];
    NSString*     item = [items objectAtIndex:[indexPath indexAtPosition:1]];
    UIAlertView* alert = [[UIAlertView alloc] initWithTitle: @"選択"
                                              message: item
                                              delegate: nil
                                              cancelButtonTitle: nil
                                              otherButtonTitles: @"OK", nil];
    [alert show];
    [alert release];
}

// 行が編集されたときに呼ばれる
- (void)tableView   :(UITableView*)tableView
  commitEditingStyle:(UITableViewCellEditingStyle)editingStyle
   forRowAtIndexPath:(NSIndexPath*)indexPath
{
    if(editingStyle == UITableViewCellEditingStyleDelete)
    {
        [items removeObjectAtIndex:[indexPath indexAtPosition:1]];
        [self.tableView
             deleteRowsAtIndexPaths:[NSArray arrayWithObject:indexPath]
             withRowAnimation:UITableViewRowAnimationTop];
    }
}

// ナビゲーションバー左のボタンがタッチされたときに呼ばれる
- (void)addItem
{
    [items addObject: [NSString stringWithFormat: @"item%d", nextID++]];
    [self.tableView reloadData];
}

// ナビゲーションバー右のボタンがタッチされたときに呼ばれる
- (void)startEditing
{
    [self.tableView setEditing:YES animated:YES];
    self.navigationItem.rightBarButtonItem =
        [[[UIBarButtonItem alloc]
             initWithBarButtonSystemItem: UIBarButtonSystemItemDone
             target: self action: @selector(finishEditing)] autorelease];
}

// 編集中にナビゲーションバー右のボタンがタッチされたときに呼ばれる
- (void)finishEditing
{
    [self.tableView setEditing:NO animated:YES];
    self.navigationItem.rightBarButtonItem =
        [[[UIBarButtonItem alloc]
             initWithBarButtonSystemItem: UIBarButtonSystemItemEdit
             target: self action: @selector(startEditing)] autorelease];
}

@end
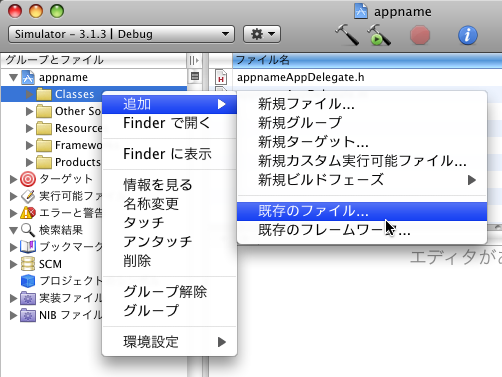
ファイルを作成したら、 Xcode の Classes フォルダのコンテキストメニューで [追加]-[既存のファイル] を選択し、プロジェクトに追加します。
これで TableView の完成です。まだウインドウに追加していないので表示は差れませんが、ビルドが正常に通ることは確認しておいた方がよいでしょう。
Delegate クラスを書き換える
最後に、上記の TableView を(ナビゲーションと共に)ウインドウに追加するように、 Delegate クラスを書き換えます。まず、 Classes/appnameAppDelegate.h を以下のようにします。
#import <UIKit/UIKit.h>

@class MyTableViewController;

@interface appnameAppDelegate : NSObject <UIApplicationDelegate> {
    UIWindow*               window;
    UINavigationController* navigationController;
    MyTableViewController*  viewController;
}

@end
同様に、 Classes/appnameAppDelegate.m に以下の内容を保存します。
#import "appnameAppDelegate.h"
#import "MyTableViewController.h"

@implementation appnameAppDelegate

- (void)applicationDidFinishLaunching:(UIApplication *)application {
    window = [[UIWindow alloc] initWithFrame:[[UIScreen mainScreen] bounds]];
    viewController = [[MyTableViewController alloc] init];
    navigationController = [[UINavigationController alloc]
                               initWithRootViewController:viewController];
    [window addSubview:navigationController.view];
    [window makeKeyAndVisible];
}

- (void)dealloc {
    [viewController release];
    [navigationController release];
    [window release];
    [super dealloc];
}

@end
ビルドして実行すれば、晴れて TableView が表示されます。
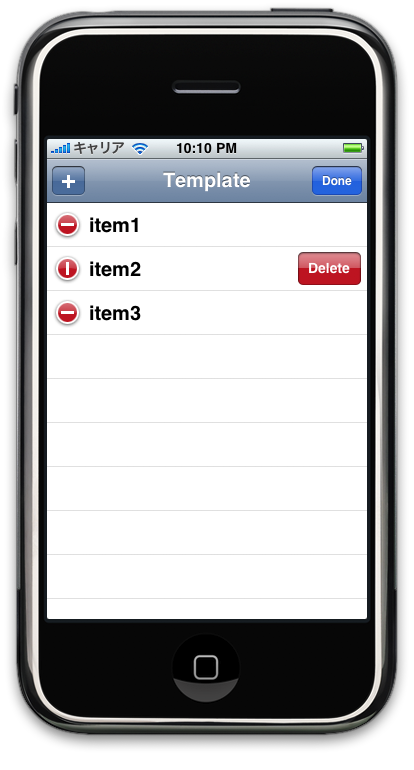
ナビゲーションバーの左端の「+」ボタンをタップすると項目が追加され、項目をタップするとアラートが表示されます。また、ナビゲーションバー右の「Edit」ボタン or スワイプで削除ができます。
これで完成です。 IB なしで作る iPhone アプリのテンプレートとして、ご自由にお使いください。
詳しくはこちらの記事をどうぞ!
この記事にコメントする